1. Open VMware vCenter converter Standalone and select Connect to a local server & Click Login.
 2.To perform a P2V migration in vCenter converter standalone, click "Convert Machine"

3. Select source type"Power on"

Select "This Local Machine" if you want to migrate the physical machine to where VMware vCenter Conversion is installed. Otherwise, click "Remote windows machine or Remote Linux machine" and then enter the IP address and Login credentials for the source system. click Next
Note:
Insert Administrator USERID and Password only not other user
 4. In Converter Security warning-> Click Yes to continue.

5. Enter the destination server address and login credentials for the system running VMware ESX/ESXi. Click Next
Note:
Insert Administrator USERID and Password only not other user

6. In Converter Security Warning Wizard -> Click on Ignore

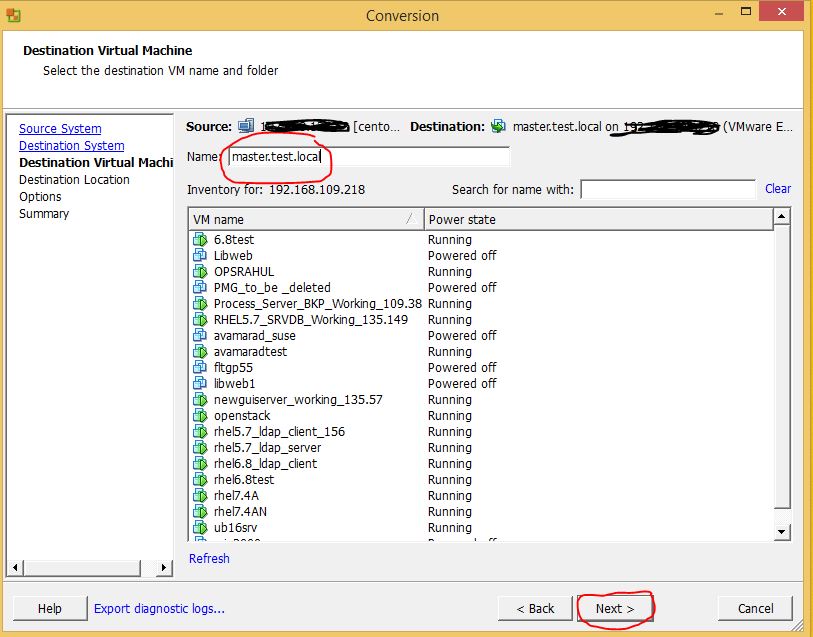
7. Insert the virtual machine Name

8.Select the location for the New virtual machine

9. Review the system parameters on the option tab.

10. Increasing the volume of destination machine. Go to Data to copy -> Edit -> Advanced option

11. Under Tab Device -> Edit -> Increases memory & CPU (number of virtual sockets & number of core per sockets)

 12. Increasing the Network Adapter to connect.. under Tab Network -> Edit

13. Under tab Advance option -> Edit. You can set post - conversion Power state

14. It's very important to set Helper VM network.
Note: when we convert a powered on Linux machine, converter standalone creates a Helper virtual machine to clone the destination. The Helper virtual machine needs network access to the sources machine to clone the source file. ( Be sure the IP address you specify for the Helper virtual machine is not already in use in the network.)

15. Review your configuration on the summary tab; then Click Finish to perform the migration.


3. Select source type"Power on"

Select "This Local Machine" if you want to migrate the physical machine to where VMware vCenter Conversion is installed. Otherwise, click "Remote windows machine or Remote Linux machine" and then enter the IP address and Login credentials for the source system. click Next
Note:
Insert Administrator USERID and Password only not other user


5. Enter the destination server address and login credentials for the system running VMware ESX/ESXi. Click Next
Note:
Insert Administrator USERID and Password only not other user

6. In Converter Security Warning Wizard -> Click on Ignore

7. Insert the virtual machine Name
8.Select the location for the New virtual machine

9. Review the system parameters on the option tab.

10. Increasing the volume of destination machine. Go to Data to copy -> Edit -> Advanced option

11. Under Tab Device -> Edit -> Increases memory & CPU (number of virtual sockets & number of core per sockets)


13. Under tab Advance option -> Edit. You can set post - conversion Power state

14. It's very important to set Helper VM network.
Note: when we convert a powered on Linux machine, converter standalone creates a Helper virtual machine to clone the destination. The Helper virtual machine needs network access to the sources machine to clone the source file. ( Be sure the IP address you specify for the Helper virtual machine is not already in use in the network.)

15. Review your configuration on the summary tab; then Click Finish to perform the migration.


Buy microsoft office 2016 home & student (1 MAC) (MAC Version) and Get Life Time License for Word, Excel, PowerPoint, and One Note. You can store files in the Cloud with OneDrive. OneNote notebooks help you easily organize your notes and find just what you need fast. Share notebooks to simplify group projects.
ReplyDelete