Dynamic Host Configuration
Protocol is a network protocol used to dynamically distribute network
configuration parameters, such as IP addresses, gateway, and DNS for network
interfaces. DHCP Server assigns IP addresses automatically to all systems, so
system admin need not assign IP addresses manually to client machines in the
network.
In this tutorial, we will
cover how to install and configure a DHCP server in CentOS 7/RHEL 7
Testing Environment Setup
DHCP Server – Centos7.4
DCHP Client – Centos7.4,
Red Hat 7.4 , Ubuntu 16.04, Windows- 8 & 10


DHCP Port
dhcp
server port – UDP port no -67
dhcp
client port – UDP-port no- 68
Note:
The server listens on port 67 for requests and
responses
to the client on port 68.
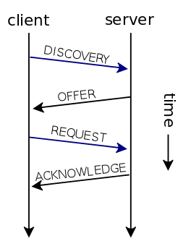
DHCP
works on DORA Concept
D : DISCOVER
O : OFFER
R : REQUEST
A : ACKNOWLEDGMENT
Let's briefly explain How
to DHCP Work ?
1.
When a client computer (configured to use DHCP) and connected to a network is
powered on, it forwards a DHCPDISCOVER broadcast
(IP 255.255.255.255) message to the DHCP server. If there is one or more DHCP servers on the
network , they will hear the request on port 67.
2. After
the DHCP server receives the DHCPDISCOVER
request message, it replies with a IP lease DHCPOFFER
message. The reply use the broadcast address 255.255.255.255 but the frame
contains the MAC address of the sending Client , so only the requesting device
receives the offer.
3.
Now the client receives the DHCPOFFER
message, and it sends a DHCPREQUEST message
to the server indicating, it is prepared to get the network configuration
offered in the DHCPOFFER message.
4.
After that DHCP server receives the DHCPREQUEST
message from the client, and sends the DHCPACK
message showing that the client is now permitted to use the IP address assigned
to it.
Installing DHCP Server
Using below given command, we install DHCP Server on Centos7.4
Important: Assume that there are more than one network interface
connected to the system, but you want the DHCP server to be started only on one
of the interfaces, set the DHCP server to start only on that interface.
Open the file / etc / sysconfig / dhcpd, add the name of
the specific interface to the list of DHCPDARGS, for example if the interface
is em1, add:
Now Save the file and exit.
Configuring DHCP Server
The sample of DHCP configuration file is given in path : /usr/share/doc/dhcp*/dhcpd.conf.sample
Now see the sample DHCP configuration file and set your
configuration according to your requirement.
Add the option given
below:
# Common configurations to all supported
networks...
authoritative;
ddns-update-style interim;
ignore client-updates;
subnet
10.5.5.0 netmask 255.255.255.0{
range 10.5.5.2 10.5.5.150;
range
10.5.5.160 10.5.5.254;
option routers
10.5.5.1;
option
ip-forwarding off;
option
broadcast-address 10.5.5.255;
default-lease-time
4600;
max-lease-time
7200;
option
domain-name-servers 196.1.109.47;
option domain-name
"cdotd.in;
# Assign static IP to DHCP client….
host Centos {
hardware ethernet 0:0:c0:5d:bd:98;
fixed-address 10.5.5.151;
host Red Hat {
hardware ethernet 0:0:c0:5d:bd:95;
fixed-address 10.5.5.152;
}
host Ubuntu {
hardware ethernet 08:00:07:26:c0:a5;
fixed-address 10.5.5.153;
}
host Windows {
hardware ethernet 00:4j:8k:13:8g:3a;
fixed-address 10.5.5.154;
}
Now save the file and close it
Note: you can find out the Linux MAC address using command.
Now start the DHCP service for the
mean time and enable it to start automatically from the next system boot using
the following commands:
Client – Centos7.4
Add the option given below:
TYPE=Ethernet
PROXY_METHOD=none
BROWSER_ONLY=no
BOOTPROTO=dhcp
DEFROUTE=yes
IPV4_FAILURE_FATAL=no
NAME="Profile
1"
UUID=e48ef4ab-e915-4061-a251-b796ce4fe8d1
ONBOOT=yes
Now save the file and close it
Restart the network service


Procure microsoft office 2019 home & business, Step up with the new range of Microsoft Office, containing the 2019 versions of your favorite productivity software. Upgraded Word, Excel, PowerPoint and OneNote come with enhanced new time-saving features and a sleek, modern look.
ReplyDelete